| LAVERDAMANIA |
Suspensions:
Stanchion
lenght | Oil | Viscosity | Spring lenght | |
|
Fourche Ceriani: 35
mm (750>74, early triples) | 595mm |
170cc | 10
to 20 | 485
mm |
|
Fourche Ceriani: 38 mm (750) |
570mm |
200 cc (usine), 250 cc (recommandé) |
5 to 10 |
505 mm |
|
Fourche Ceriani: 38 mm (1000) | 595mm |
200 cc (usine), 250 cc (recommandé) |
5 to 10 |
505 mm |
| Fourche Marzocchi: 38mm (1000>80, 1200) | 630mm |
300cc | 5
to 10 | 465
mm |
| Fourche Marzocchi: 38mm (1000 RGS, RGA, Corsa) | 660mm | 300cc | ||
| Fourche Marzocchi M1R 42mm (1000 SFC) |
Jusqu'à 180mm du haut des tubes (ressorts
enlevés) | 5 | ||
| Amortisseurs
AR Ceriani (750, 1000) |
Plein | 20 |
230 mm (total lenght: 360mm) |
Fork
setup (38mm Ceriani basis):
First check that they are working properly - do this before spending useless hours
tuning them - because once you get them sliding properly all the setting can change!
Check both forks are working the same - no static friction. 90% of all bike front
suspension problems are too much fork friction.
Here is how you fix it
(Ref: Dave Searle - MCN Magazine):
"Here's a systematic way to go about tuning
out static friction. To make sure the forks are actually parallel and that the
triple clamps are not twisted, sight down the forks from the top to the front
axle, and from the side across the faces of the tubes and sliders.
Misalignment
will be visible to the naked eye, and you should try to correct this first. Often,
it is not even necessary to loosen the bolts on the triple clamps to realign the
tubes.
Merely squeezing the front tire between your knees and giving the
handlebars a forceful twist works easily on all but the best large-diameter forks.
If you're shocked at how easy it is to tweak the alignment, you'll also appreciate
how common misalignment can be. With the forks aligned as carefully as you can
with this technique, turn your attention to the front axle. Most axles thread
into one side and are clamped on the opposite side. If you have a vernier caliper,
measure the distance the end of the axle protrudes from the fork leg. Now, loosen
the axle clamp bolts (if you have a fork brace loosen this as well - DH) until
they exert no pressure. Next, forcefully compress the forks several times with
the front wheel against a solid stop. If the forks were pinched or spread, this
technique will allow them to find the position that gives the least misalignment.
We found our axle had moved .018". The forks had been pinched.
Now turn your
attention to the triple clamps again. (these may have moved when it was tried
down for transporting DH) Verify that the fork tubes both project the exact same
distance through the tops of the clamps, that any preload adjusters are set exactly
the same, and adjust if necessary."
Ok they work well now to fix the compression
damping. Put another 140-180mL of fluid in, even if the manuals says 200 - the
manuals are wrong. 360-380mL are good in Cerianis
38- 110-120 airgap with
no spring measured from the back of the tube(tank side). First empty all the oil,
take the forks of and let them stand upside down for a day. Put some 2 or 5 weight
flushing oil through to get all the rubbish out -pump it up and down until the
oil coming out the drain holes is clean. The put them back in and put about 250
in - pump the fork up and down to fill the airgap at the bottom and then put the
rest in. Before you put the springs back in, give the fork a few slow pumps to
make sure its all oil down there and not a combination of air and oil.
Ride
it, if it still dives with 380 in consider going to a heavier weight oil. If the
fork internals are worn maybe up to 20W.
Ceriani et Marzocchi 38: How they work (by Pierre Savaro):
|
9- Rondelle calibrée de clapet x2 |
 |
Compression rapide figure A |
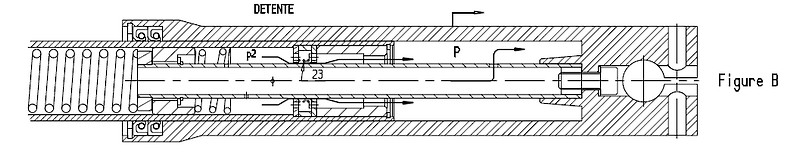 |
Détente figure B |
 |
Compression lente Fin de détente figure C |
 |
Fin de compression maxi figure D |
|
Particularités de la fourche marzocchi: |
Rear suspension:
Many
manufacturers propose shocks for Laverda (Ikon, Hagon, Progressive Suspensions,
Bitubo, etc...). However, one of the best product is Ikon (ex Koni).
They are
available at the Laverda specialist Wolfgang Haerter, website: www.laverdacan.com,
email: laverda@lightspeed.ca
Bike | Référence
Ikon |
350/500 | 7610-12825SP10 |
750 | 7610-1318 |
1000/1200 | 7610-1397 |
Some
Suspension Notes for Laverda triples (by Doug Home)-
Surprisingly,
the heavy old lump can be tuned to make it a passable cornering weapon - it'll
never challenge a well ridden GSXR750 but it will embarrass quite a few average
punters on their shiny new toys.
Safety first:
Replace the steering head spindle with a better quality one. The
standard one breaks in half.
Use 2 angular roller bearings on the spindle.
Replace all wheel bearings and make sure they are secure in the wheel - the
recesses wear oval.
Replace the swing arm bushes with 2 needle bearings.
Recommended bracing:
Steering
head 2-3mm plate braces down to the tube under the CDI and cradle tubes.

Corner brace the junction of the under tank tube to 2 vertical motor cradle tubes.
Cross brace the 2 cradle tubes under the oil cooler.
Double brace the cradle
tubes behind the airbox.
Raidaly plate brace the swing arm mounts.
Bend
and weld on a lower swing arm hoop then plate brace the front.

--------------------------------------------------------------------------------
On the bench
Front:
First check that the forks are working properly; most old forks
dont! Do this before spending useless hours tuning them.
Pull them apart
and make sure they are assembled as the designer intended.
Flush out all
the rubbish before filling them with expensive fluid.
While you have the
forks open - check the bores, flapper valves, sliders and rod for wear.
Replace
as required and put in new seals.
Make up some top nuts that have a recesses
for preload spacers.
Until you have the right preload length; make the recess
dimensions to suit some cheap and nasty washers.
Recommended
modification:
Fit a fork brace (unless you have a M1R fork) -
Telefix or equivalent.

Move your calipers to the rear of the fork.
Fit a set of RaceTech Gold valve
emulators (or perhaps an entire TechnoFlex cartidge with compression and rebound
adjustment).
Tighten up the clearances between the flapper valve and the damper rod.
Now
fill them with dedicated fork fluid. Do not use oil or ATF! These will aerate
and foam badly under severe use.
Synthetic fork fluids will will last longer
at high temps; and they will get hot on bumpy roads, and so they will keep their
designed viscosity - read damping. Some good fork fluids are: Motul 10W-15W, Bel-Ray
HVI 10W or Ohlins #10.
Make sure they are filled to the right and same level.
The "spring out" air gap should be around 110-140mm from the back of the
fork when it is in the clamps.
Pump the forks a few times during filling
to ensure there are no air gaps to misleed you.
The weight of oil used will
depend on the wear in the fork and the machined clearances.
Now make sure
they slide properly - no static friction.
Stiction:
To test for stiction - put the forks in the bike and fit the brace
and wheel.
Press down on the front end and release.
Measure the distance
from the wipers to the lower triple clamp.
Next, lift and slowly release.
Measure again.
The difference between the numbers is stiction. 10mm is average;
zero is ideal.
Make sure the forks are actually parallel - measure the gaps
at a few points between the bottom triple clamp and the seal. Make sure the triple
clamps are not twisted.
Loosen the bolts on the triple clamps, the mudguard,
the fork brace and the axle.
Compress the forks several times.
If the
forks were pinched or spread, this will allow them to find the position that gives
the least misalignment.
Do this every time you work on the forks or have
the wheel out.
Set the fork tubes so they both project the exact same distance
through the tops of the clamps.
Another way to do this is to put the bike
on the main stand, remove the top nuts and springs. Lift the wheel up until the
forks are compressed and let the wheel go. The mass of the wheel, oil and sliders
should pull the forks down. If it does not undo the wheel axle clamp bolts, the
fork brace and the triple clamps and twist the stanchions around until the do
slide freely. If you cannot find a sweet spot; replace seals, clean wipers and
look for bent stanchions.
Fork Brace:
Fitting one of these keeps the forks parallel around the seals. This will help
reduce stiction.
Caliper position:
Having the caliper
in the standard position has to add to the bending force mid stanchion - stiction.
It will also try to reduce the trail by pushing the wheel under - tucking.
Neither will help handling under brakes.
They were put there in the
days when cooling big cast iron discs was a problem.
Move them to the back
of the slider. The ideal position is to have the centreline of the caliper level
with the wheel's centreline. The forces from this arrangement counter act fork
dive so help compression damping and also will increase the trail slightly. Both
will help in being able to carry brake later into the corner.
Fork springs:
The rate of a progressive
spring increases with the compressing force. So the spring gets stiffer as it
compresses more. Most progressives actually work as a 2 stage spring - soft then
hard.
Tuning for the right stiffnes at the right time would be interesting
and would change when you added or subtarcted some fluid.
Here in a quote
from RaceTech's web page that says it better than I can: "In order to make sense
of progressively wound springs you really have to map out the force as you compress
the spring. For example a spring marked 20/40 lb/in may start out at 20 lbs/in
in the first inch but where does the 40 refer to? It might be referring to the
rate in the 4th inch or it could be referring to the rate in the 6th inch. This
would cause a huge difference in ride.
Progressives are ok in a modern highly
tuneable fork but questionable in an old damper rod fork with no way of adjusting
rebound damping; so you may well end up with pattering using progressives.
Put in the standard spring unless you have new or refurbished internals and are
using a thin fluid - less than 5W.
Then if you need a change, first put in
more fluid and then get a heavier straight spring.
Setting
up the forks:
I would recommend pulling the stanchions up through
the triple clamps at least 15mm. This may cause a problem with the Jota or RGS
style bars. The SFC is ok as it has clipons.
Back:
Trash the existing shocks. Recommended
modification: Move the top mount forward to the junction of the cradle tube and
brace to suit.
Get a set of rebuildable shocks ie: Ikon 7610-1397 (the old
Konis) or a set of adjustable length gas shocks - perhaps some Ohlins 36PRCLBs
or TechnoFlex Stereos.
If you have a rebuildable set; rebuild them - new
seal, O ring and some good fluid.
--------------------------------------------------------------------------------
On the Bike
Setting up the sag:
The first step to
setting up any bike is to set the spring sag and determine if you have the correct
rate springs.
Spring sag is the amount the springs compress between fully
topped out and fully loaded with the rider on board.
Overall sag and front-to-rear
sag bias will depend on chassis geometry, track or road conditions, tyre selection,
rider weight and riding style.
Front:
Lift the front wheel and extend the fork completely. Measure from the wiper (the
dust seal atop the slider) to the underside of the bottom triple clamp.
This
measurement is L1 - top out length.
Tie a cable tie around the stanchion
between the bottom triple clamp and wiper.
Take the bike off the stand. Get
an assistant to balance the bike from the rear.
Get on the bike and assume
the normal riding position - if you are setting up for a long ride with a pillon
or luggage - put this on the bike.
Push down on the bars as if you were braking
heavily. Relax.
Measure the distance between the cable tie and the wiper.
This measurement is L2 - bottom out length.
Lift up on the front end and
let it drop very slowly. Where it stops, measure from the cable tie to the wiper
again. This measurement is L3 - friction length.
L2 and L3 are different
due to friction in the seals and bushings, which is particularly high for damper
rod forks.
Halfway between L2 and L3 is where the sag would be with no friction.
Therefore L2 and L3 must be averaged and subtracted from L1 to calculate
true spring sag.
Static spring sag = L1 - [(L2 + L3)/2].
Set the front
up by putting in enough spring preload spacers - use a washer stack until you
have the right height then machine up a piece - get both sides the same.
OEM spacers can be 20mm different!!
The right height is about 15% of total
travel.
This depends on the bike set up (has the overall travel been modified?)
and riding style.
The lower the sag the quicker you'll be into damping -
ok for the track but a bit uncomfortable on a long touring ride.
If it still
sags with say more than 50mm of spacers; go to a stiffer spring.
Front
preload problems:
Too little sag - reduce preload.
Fork stiffens up after a short amount of travel.
Tyre skipping - especially
a hard side tyre like a Michelin Macadam.
Losing front end (radial tyre)
on corner entry .
Too much sag - increase preload.
If everything
touches on cornering.
If you hear clicking from the forks when you suddenly
power up.
Bike turns in slowly.
Forks compress too far on smooth turns.
Back:
Load the bike to how you will
ride it.
Think really carefully about putting all your movable furnishings
above and behind your rear axle.
The effect is not noticable on a Harley but
a normal bike's suspension (not to mention the tyre loading) will be totally screwed
up doing this.
Get a tank bag, stronger girl/boy friend or travel lighter.
First set the wheel adjusters so the wheel axle is exactly parallel to the
swing arm axle.
Measure this precisely.
Extend the suspension completely
by lifting the wheel off the ground.
It helps to have a few friends around
here.
Measure the distance from the wheel axle to the centre of the shock
top bolt.
Do both sides. This measurement is L1 - top out length.
Take
the bike off the stand and put the rider on board in riding position.
Have
a third person balance the bike from the front.
First, push down on the rear
end as far as you can and let it extend very slowly.
Where it stops, measure
the distance between the axle and the bolt centres again.
Do not bounce!
This measurement is L2 - bottom out length.
Then, still sitting on the bike,
have your assistant lift up on the rear of the bike up about 25mm and let it down
very
slowly.
Where it stops, measure it. This measurement it L3 - friction
length
To get the actual sag figure you find the midpoint by averaging L2
and L3 and subtracting them from L1.
Static spring sag = L1 -[(L2 + L3)/2].
Adjust the preload by turning the spring collars. Rear sag is typically 15%
of total travel.
If you cant get the right sag ; go to a stiffer spring.
Back preload problems:
Too little
sag - reduce preload.
Wheel skips sideways in the bends, especially on
bumps .
Too much sag - increase preload.
Wallowing in a corner.
Bike squats under acceleration especially in a corner .
Foaming on bumpy
roads .
--------------------------------------------------------------------------------
On the road
Compression damping:
This is the damping
that happens when you first hit a bump - it hopefully stop the forks from banging
down to the stops and trying to jar the bars out of your hands.
The bumpier
the road, the better you want your compression damping to work so that you are
not kicked off the bike.
It is set by altering one or some of the following:
Air gap/oil volume.
Note that raising the oil level increases the compression
ratio (oil:air) in the front fork and so changes the progressiveness of the spring.
(Why fit progessive springs - just add
more oil).
It will not alter the
damping directly.
Fluid's viscosity.
Note also changing the oil viscosity changes the damping.
For both the compression
and rebound.
Adjusting your brand new emulator or cartridge.
Rebound
damping:
This is the damping that happens after you have hit the
bump and it "lifts" the bike back to its sag position as quickly as possible.
The faster you go, the better you want your rebound damping to work so it can
keep the wheel in contact with the ground.
It is set by altering one or some
of the following:
The size of the gap the fluid flows through Fluid's viscosity.
High and low speed damping:
This is the major limitation with damper
rod fixed orrifice "velocity-squared" damping forks like we have.
As there
is no adjustment on compression or rebound; the faster the wheel moves up, the
more fluid is shoved through the holes. So the steeper the bump, the faster the
suspension moves.
Not related to speed of the bike at all! But the bike speed
does matter: if you double the bike speed over particular bump, you will double
the vertical wheel lift velocity.
If the vertical lift velocity is doubled,
the flow rate through the damping holes is doubled.
So over a series of steep
bumps it can do what motoxers call "pump up" and get progressively harder.
The only alternative is to fit a cartridge or at least an emulator.
Setting
the following up as best you can will make it a bit better.
Have no stiction
correct set up for basic damping lighter fluid fill with the best fluid you can
lay your hands on adjusting the spring pressure on the emulator valve stack.
--------------------------------------------------------------------------------
Damping - setting the compression
Front:
All that
you can do is to set the airgap and use the right fluid. There is no adjustment.
Replacing the old worn out parts will reduce the gap that the fluid has to
pass through which means that a lighter fluid can be used - this will improve
the compression and rebound response but not their limits.
So fit a Race
Tech Gold valve emulator. These will reduce the front-end dive especially when
braking.
This lets the suspension do what it was designed to do - absorb
bumps. The emulators are adjusted by setting the valve stack spring pre-load.
Increasing the pre-load will stiffen the fork during compression, but has
no effect on rebound.
On the Bike:
Start
with around 130 -140mm of gap between the top of the fluid with the springs out
and the forks are fully compressed. Take the nuts and springs off, put a block
of wood under the tyre so the forks are fully compressed and then put the fluid
in. The amount of fluid varies dependant on fork length, fork brand, spring size
etc but I put in about 375ml. The 200ml as mentioned in the Green Book
is
garbage
Test by braking on a normal road with normal tyre pressures.
If
the front dives or uses up all it's travel under braking, increase the damping
by adding 5mL of fluid per leg until it does not bottom out.
Now move to
a bumpier road and test again.
The forks should bottom over the worst bumps
only.
Now go to a bend and test.
Under full brake - with the back wheel
getting really light or even a little off the ground, you should still have damping
going - you should still "feel" the road and have control.
If you cant get
good enough damping without putting so much fluid in it locks up the forks ; then
put heavier fluid in.
It is ok to "blend" the weight.
Front
compression problems:
Too little compression damping -
screw in the emulator nut, add more fluid or increase its viscosity.
Dives
under braking.
A loose feel when tipping into a corner .
Too much
compression damping - screw the emulator nut out, drain some fluid or reduce
its viscosity
Forks are "solid".
Bike difficult to turn in .
Front
wheel skips on bumps.
Forks judder when braking on a straight.
Front
end chatters coming out of corners.
Back:
These are air over oil so the size of the airgap matters a lot.
This is decided
by you telling the tech what bike it is, masses, riding style etc.
If you
are rebuilding the shock or changing its design parameters by say, putting them
on a lighter bike, then 90mL of 5W fluid is a start point.
If they bottom
out with this, increase the fluid a little (2mL) or put in a heavier fluid.
If the damping goes off after riding hard over bumpy roads for a time - put in
a better fluid - its aerating.
Hard used; these things really have a problem
with aeration and foaming so only use the best money can buy.
Most shocks
have a compression valve stack fitted. They can be altered but I would suggest
fiddling with the amount and viscosity of the fluid first.
On
the Bike:
Find a corner with bumps on the exit. Exit over the corners
and progressively increase the acceleration.
The back end should follow the
ground - no skipping.
Find some rough bumps on a corner, the shock should
bottom on the roughest but it should not have a slamming sensation.
Back
compression problems:
Too little compression damping -
add more fluid or increase its viscosity.
A loose feeling from the back when
powering though bends.
If the back squats especially under acceleration.
If the bars shake especially under acceleration.
If the back starts to wallow.
Too much compression damping - drain some fluid or reduce its viscosity
Harsh ride over ripples.
If the rear end "breaks out" especially under acceleration.
--------------------------------------------------------------------------------
Damping - setting the rebound
Front:
Rebound damping is responsible for the stability and the cornering
characteristics.
It is based on the viscosity of the fork fluid and the size
of the holes this fluid flows through.
The desired weight of fork fluid has
been covered above.
The only way to improve air gap forks is to "tighten"
up the tolereances around the rod and flapper valve.
There is no adjustment.
Chose the lightest fluid you can use and still have usable compression damping.
On the Bike:
Find a short sweeper and take
it at a steady pace.
The forks should compress for the turn, rebound and
settle.
If the forks rebound too quickly the bike will drift wide.
If
the rebound is too slow, the bike will tuck.
Find the appropriate balance.
With the bike turning well, the bike should return to a steady state quickly
and not deflect off bumps.
Front rebound problems:
Too little rebound damping - increase fluid viscosity.
Excessive pogo action through chicanes.
Front end shakes (not chatters)
in corners.
Front end shoots up too fast after braking .
If the forks
top out even though you are using quite a bit of sag.
If the front starts
wallowing .
If the front bobbles as you come off the brakes.
Too much
rebound damping - reduce fluid viscosity.
Forks pump down on fast bumpy
corners.
Back:
Ikons/Konis have
a dial 1-->4 for rebound - this reduces the hole size that the fluid has to travel
through.
It works ok but not great.
It also has a rebound stack.
For hard riding or racing I would get a gas filled remote style as these reduce
aeration.
On the Bike:
Find a relatively
fast straight with braking bumps leading into the entrance of a corner.
Reduce
the rebound damping by turning down the dial until the rear end begins to hop
or feel loose.
Increase until the sensation goes away.
Find a bump that
tends to kick the back up.
If the rear end bounces up, add rebound.
Find some ripples. The bike should track straight through with the rear wheel
extending to the ground before the
next impact. If it does not, reduce the
rebound.
Back rebound problems:
Too little rebound damping - increase the dial numberor increase fluid
quantity/viscosity.
Bike wallows.
Rear jacks up too fast on braking.
Rear end chatters exiting slow corners.
Bike kicks off ripples or bounces
on bumps.
If the back end weaves and shakes the front.
Too much rebound
damping - decrease the dial number or reduce fluid quantity/viscosity.
Rear end pumps down on bumpy corners .
--------------------------------------------------------------------------------
On the Wheels:
Tyres:
All the above will work better
with radial tyres.
A radial flexes more in the sidewall so it can keep a
bigger contact patch on the road.
This will translate into more feedback
and better grip to go with your improved suspension.
You can lean it more
and your corner speed will increase.
Some of the radial lookalikes (Avon,
Dunlop, Metzeler) X plys with radial tread patterns, will work almost as well.
Tyre selection:
This is a typical
metric label format "110/80-18 58V".
The first 3 numbers are sizes and the
last 2 are normally ignored - if you go fast; dont.
The "58" is the tyre's
load index and should be above 58 for front tyre on this bike.
A 58 LI is
a load of 236kg ie:80% of the loaded bike's weight transfered to the front tyre,
as in emergency braking, will not collapse the sidewall - which would add to theexcitement
of the manouever.
A 66 LI rear will take 300kg. That should cover 2 people
at 75kg, acceleration" squating" plus if you must; your luggage.
The "V" is
a 240kph speed rating and a ZR above that.
I limit my tyre selection to V
and ZR speed rating and +58 front load index rating and +66 rear when considering
the weight of the bike and possible +230kph speeds.
It is possible to fit
a "H" rated tyre (210kph) but if you are bothering to read all this you will most
likely want to go fast so stick with a V or ZR.
There are not a lot of 18"
V or ZR true (0 degrees bias) radial tyres around with +58 and +66 load index
; so you wont be stuck for choice.
See below.
Sizes:
Front: 100-110. If you go bigger, it will oversteer badly.
If you find a 100/80-18 58ZR - let me know!
Back: 120-130. The only rear
radial that I have found in this range is the Michelin Mac90, now called 100.
Its an ok tyre but needs a lot of work to bring it up to heat - European
riders say it never does. I tried one.
Then I tried some 150 tyres - the
Michelin Mac 90 150/70 and the Bridgestone B010 150/60.
The Mac measured
at 158 mm across the tread and was too big; the Bidgestone was 128mm across (compared
to 122 mounted on the correct width rim) and was/is great.
A 3C and SFC/RGS swing arm will take a 150 tyre. I was using standard thin web
rims with these tyres.
Things to watch for:
Tyre pressures are far more
critical to the performance of a radial than a straight X ply tyre - 1 or 2 psi
(0.07-0.14 bar) either way!
Buy a good pressure guage and spend time getting
it right.
Tubes or not - the makers of
radials say tubes so modify the rim to take a tubeless plug, clean up the rim
beads
very very carefully and watch the pressures after fitting to make sure
it is not leaking.
On a wire rim a sealing tape is required.
Cast
rims cracking - I have cracked 3 thin web rims mid spoke - 2 back and
1 front.
Was this the higher lean angles/higher grip/higher corner speed
all increasing the mid spoke bending moment leading to failure? Yes, I think it
was.
I have now put some late 1980s GSXR 18" rims on - right width, stonger
casting and they look ok too.
Here is a list of some (probably not all) 18"
V and ZR radial tyres of suitable width, speed and load rating.
(Front 100-110,
Rear 120-150 Rating (speed/load index))
Avon
AM39 110/80 ?ZR
Bridgestone
BT45V 110/80 58V
BT45V 110/90 61V
BT45V 130/80 66V
BT45V 140/70 67V
BT45V 140/80
70V
BT45V 150/70 70V
BT012SS(was BT010) 110/80 58ZR
BT012SS(was
BT010) 150/70 70ZR
BT020 110/80 58ZR
Michelin
Macadam 100 110/80
?
ZR Macadam 100 130/80 ?
ZR Macadam 100 150/80 ?
ZR Pilot Road 110/80
?
Metzeler
MEZ4 110/80 ?ZR
MEZ1 150/60 ?ZR
Pirelli
MTR 23 110/80
58ZR
MTR 150/60 67ZR
MTR02 150/60 67ZR
References:
Information from the following webpages was used in the preparation of this paper.
http://www.directparts.com/
http://www.race-tech.com/
http://teamjaysracing.com/
http://www.proven.com.au/
http://www.ohlins.com/
http://www.technoflex.nl/
http://www.factorypro.com/
http://mc.bridgestone.co.jp/
http://www.pirellimoto.com/
http://www.dunlopmotorcycle.com/
http://www.coopertire.com/avon_motorcycle/
http://www.metzelermoto.com/
http://www.tirerack.com/tires/
Doug Home
doughome@angelfire.com
The best option : Race-Tech emulators: Click here
- How to restore Ceriani original shocks:
Problem with these shocks is that no standard seal can be put in them as the size of the rod is special. Fortunately
the specialist Wolfgang Haerter had remanufactured a whole kit including a new rod with usual size, seals and rings.
The whole kit costs about 100 Euros.
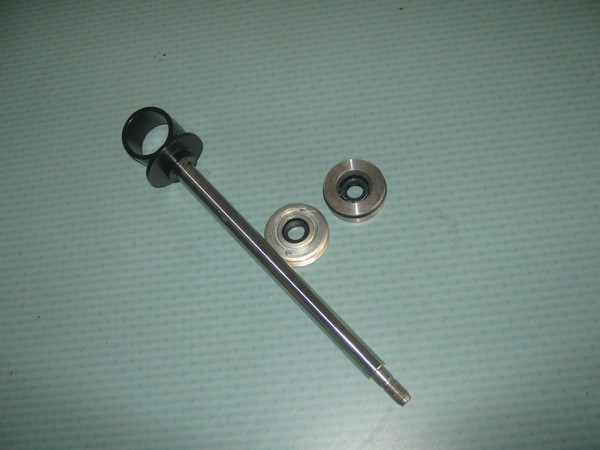
Wolfgang Haerter: laverda@lightspeed.ca